The GOLDDIGGER PREMIUM RGB is a full-sized, plug-and-play coin pusher (penny pusher) that draws and holds a crowd at any event or arcade. This European-designed limited edition pairs vandal-proof solid-wood and stainless cabinetry with a skill slider, nudge & shake alarms, oversized trays and color-changing ambient RGB LED lighting plus a 3-way USB sound system. Stands 145 cm tall, holds up to 3,000 coins, and runs on EU coins, USD coins or your own tokens.
The GOLDDIGGER PREMIUM RGB coin pusher is the full-sized, plug-and-play crowd magnet that turns the simple sound of falling coins into the busiest spot on your floor.
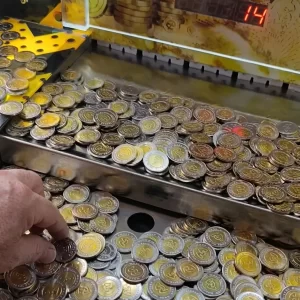
This European-designed limited edition was developed in-house and is only available through madeforarcade channels — a Black & Gold pro-line cabinet that has sold out twice before. The sight of cash piled on the edge, ready to fall, draws people in; the skill start/stop button and moving top coin-slot keep them playing. It ships ready to go: a real, full-sized machine in solid wood, stainless steel and acrylic, not a tabletop toy.
Why it works on the floor
A coin pusher is the rare attraction that holds a crowd instead of clearing one. The clatter of coins and the constant near-miss of a balancing stack pulls passers-by in and keeps them at the machine, building dwell time and giving brands a captive, smiling audience. Line several side by side and you create an inviting row that draws players from across the room. The cabinet was built for flexibility: a tactical 145 cm height that suits standing play on a pedestal or platform, with the coin slots, skill slider and coin box positioned so players can also reach everything comfortably while seated. It is a buy-once asset that earns its place at events, arcades and gamerooms again and again.
Premium build, skill & fair play
Oversized stainless steel platforms hold more coins, with sloped side “house-skimmers” that give the house its advantage and divert skimmed coins to a separate rear chamber. A raised slider edge adds the thrill of stacks balancing on the verge of falling, while the standard skill slider lets players steer where coins drop — real interaction, not pure chance. The built-in nudge detector instantly closes the funnel and sends coins to the house when anyone shoves the cabinet, and a shake-alarm does the same. Full “vandal-proof” cabinetry, gold edge protection all around, a coin acceptor/comparator that rejects strange coins, castor wheels and adjustable stabiliser feet round out a machine built to take a beating and keep earning. The PREMIUM RGB version adds color-changing ambient LED lighting for extra atmosphere, plus a built-in 3-way adjustable sound system with USB and subwoofer — load your own tunes if you like.
Also known as a penny pusher, coin dozer or coindozer. Works on EU coins, USD coins or your own tokens — a well-filled machine holds up to 3,000 coins. The RGB light pack and matching metal game tokens are available as options to add even more atmosphere and keep players going longer.
This EC Declaration of Conformity (Annex II.1.A, Machinery Directive 2006/42/EC) confirms that the coinpusher penny pusher golddigger PREMIUM RGB version, manufactured by Made for Arcade B.V., Besterdstraat 9a, 5051HH Goirle, Nederland, complies with the relevant provisions of the Machinery Directive 2006/42/EC, EMC Directive 2014/30/EU and RoHS Directive 2011/65/EU.
Harmonised standards applied: EN ISO 12100:2010, EN IEC 61000-6-1, EN IEC 61000-6-3, EN IEC 63000. The technical file is held by the manufacturer at the address above.
The Golddigger is a premium, RGB-lit coin pusher (penny pusher) — a token-pushing arcade machine where dropped coins nudge a tray of tokens towards an opening. This manual covers set-up, operation, the coin acceptor, the RGB lighting, the audio system, and the digital controller with its settings menu and error codes.
Caution: this is a heavy machine — keep it upright on a flat, stable surface. Live mains is present inside whenever the doors or panels are open, and the coin slide can begin moving immediately at start-up, so always switch off and unplug before opening, and keep hands out of the mechanism.
Disclaimer
Made for Arcade makes no representations or warranties with respect to this manual and, to the maximum extent permitted by law, expressly limits its liability for any failure to conform to any warranty resulting from the replacement of this manual with another. In addition, Made for Arcade reserves the right to revise this publication at any time without obligation to notify any person of the revision.
The information in this documentation contains general descriptions and/or technical characteristics of the performance of the machine mentioned in this documentation. This documentation is not intended as a substitute for, and should not be used to determine, the suitability or reliability of this machine for specific user applications.
It is the duty of such user or system integrator to carry out — in relation to the relevant specific application or use of the product — an adequate and complete risk analysis, evaluation and testing of the products.
Please note: all images used in this manual are for illustrative purposes only and may differ from the actual product. This is because the colours, dimensions and other properties of the actual product may differ from the image.
Made for Arcade and/or its affiliates or subsidiaries are not responsible or liable for any misuse of the information contained in this document. If you have any suggestions for improvements or changes, or have found any errors in this documentation, please let us know.
All relevant national, regional and local safety regulations must be followed when installing and using this machine. For safety reasons and to ensure compliance with the documented system data, the components may only be repaired by the manufacturer.
If machines are used for applications with technical safety regulations, the relevant instructions must be observed. Failure to observe this information may result in personal injury and/or damage to the machine.
This machine is intended for entertainment purposes only. It is not intended for use for profit, for the wagering or payout of money, or for gambling or games of chance. Made for Arcade makes no representation or warranty that the use, installation or operation of this machine is permitted or lawful in any particular region, country, jurisdiction or venue. It is the sole responsibility of the buyer and/or end-user to ensure that their use of the machine complies with all applicable laws, regulations and licensing or permit requirements (including any gambling, gaming or amusement regulations).
This is the English user manual (or an automatic translation thereof). Manuals in other languages may be available on request.
Power supply and surge protection
Arcade and entertainment machines are computer-controlled and contain sensitive electronics. Mains power at events, venues and even ordinary outlets is frequently unstable or “dirty” — voltage spikes, surges, sags and brown-outs, flicker, overloaded or shared circuits, generators, long extension runs and the switching of nearby equipment can all push the supply outside the machine’s safe operating range.
You must always connect the machine through a good-quality surge protector, and — wherever the supply is unreliable or the machine must not lose power unexpectedly — through an uninterruptible power supply (UPS). These sensitive machines cannot tolerate power spikes, surges, brown-outs or sudden cut-offs.
Damage, data loss or malfunction caused by power-supply problems is not covered by warranty. Failure to use adequate power protection can lead to machine malfunction and, in some cases, a risk of fire or bodily harm. If you are unsure about your power supply, consult a qualified electrician before use.
Duty cycle and cooling breaks
These machines are built for event and venue use, not uninterrupted operation. Their motors, power supplies, controllers and lighting generate heat, and running continuously lets that heat build up beyond the safe operating range. Do not run the machine continuously for more than 4 hours. After every 4 hours of use, switch it off completely for at least 10 minutes, by disconnecting the power supply, to let the components cool before resuming.
Overheating from exceeding this duty cycle can cause reduced performance, premature wear, component failure and, in some cases, a risk of fire or bodily harm. Damage or malfunction resulting from continuous operation beyond these limits, or from inadequate cooling breaks, is not covered by warranty. Always keep air inlets and outlets clear and unobstructed.
Support and service
For more information, service, technical support, ordering user manuals, or for any other questions, please contact: Made for Arcade Besterdstraat 9a, 5051HH Goirle, The Netherlands Email: [email protected] · Web: madeforarcade.com
Machine description
The Golddigger coin pusher is intended for use as entertainment. The outcome of the game is based on the luck and skill of the player as well as the objects placed in the machine. The player can influence the game with the skill slider and by aiming the coin hopper. This premium “limited edition” model adds RGB lighting, a premium audio system, a tilt-bob, house skimmers (the automatic house-bank diverter) and a digital coin computer with an on-board settings menu. The minimum age for use is 12 years; underage players should only use the machine under the direct supervision of an adult.
Intended use
The machine is intended for entertainment use — in the home, at events and at venues — always under the supervision of a competent adult. It is not intended for gambling or for the payout of money; tokens and prizes are for amusement only. The minimum age is twelve; underage players should only play under adult supervision. Do not leave the machine in operation unattended.
Safety warnings
This is a heavy machine — always keep it upright and place it on a flat, stable surface.
Live mains (220 V / 50 Hz) is present inside the machine whenever the doors or panels are open. Always switch off and remove the plug before opening.
Beware of crushing — keep hands and body parts out of the machine, as the coin slide can begin moving immediately at start-up.
Connect the machine through a good-quality surge protector; sensitive electronics can be damaged by power spikes.
Do not connect the machine if the machine, wiring, components or connection cable are damaged.
Do not disassemble, alter or modify the machine without our permission.
Unpacking and preparation
When unpacking the machine, make sure it always remains upright. The machine may be stabilised in its crate by the extended levelling feet. Do not slide the machine back and forth while the levelling feet are extended — instead carefully lift it a little and turn the levelling feet in, so the machine ultimately rests on its castors. Remove the keys from the front by carefully cutting the pull strap (do not pull on the strap). Open the front door with one of the keys to find the connection cable. Before first use, the coin acceptor must be trained on the coins you will use (see below).
Commissioning
The coin pusher works on 220 volts / 50 Hz. Inspect the outside and inside of the machine and the power cord for defects — open all panels and doors and check for damage or loose connections. Do not connect anything damaged. Close and lock all doors and panels with the enclosed keys, insert the connection cable into the back, and plug into a proper socket. Beware of crushing — keep hands out of the machine. Switch on with the red switch next to the connection cable. The machine starts up automatically, the RGB lighting and (if fitted) audio begin, and the coin slide may start moving immediately.
Operation of the machine
Inside the cabinet is a flat plate covered with tokens. One side is bordered by an opening connected to the return box (from which the player withdraws tokens and prizes). On the opposite side a slider moves back and forth like a bulldozer over the plate, toward the opening. Tokens are dropped onto the plate through the insertion slot; the aim is to push tokens over the edge into the return box. Prizes are won by placing prizes or plastic vouchers between the tokens so they are pushed off together with the coins.
Insert coins of the correct thickness and diameter into the coin hopper at the top. The coins fall and push the tokens on the platform toward the edge. By moving the coin hopper left and right you influence where the coins land. Use the skill slider to stop the platform at a tactical moment so coins fall onto an empty spot; the platform resumes after a short while, or when the slider is released.
Training the coin acceptor
The built-in coin acceptor detects inserted coins and sorts them by diameter and thickness. The coin acceptor is located inside the machine directly behind the insertion slot. By pushing out the two yellow retaining clips, the entire coin acceptor can be clicked out of the metal holder for easier access.
To train the coin acceptor, a sample coin must be placed inside it. Slide the coin holder up with your thumb, place a coin under the coin-holder slide, then slowly let the coin-holder clamp back onto the inserted coin. The diameter of inserted coins is now checked against this sample.
Next, set the thickness. Place a coin in the insertion slot and check whether it falls through to the machine. If the coin gets stuck, the thickness setting is too thin — move the red slider to the right to allow thicker coins. For more detailed instructions, see the video explanation on the Made for Arcade website.
Bypass valve (house skimmer)
The coin pusher is equipped with an automatically controlled diversion (bypass) valve that sends falling coins either to the prize bin, where players can collect them, or to a secret locked compartment (“the house bank”).
If the machine is not played for some time, the bypass valve switches to the “home position”. Any coins that fall now go to the house and can no longer be reached by the player.
If the machine is pushed or moved by a player, the bypass valve immediately switches to the “home position”. As a penalty, any coins that fall now go to the house.
When coins are inserted, the diversion valve switches to “playing mode”. Any coins or prizes that fall now go to the prize bin, which the player can withdraw to use for additional games or to collect prizes.
Tilt-bob
The coin pusher is equipped with a “tilt-bob”, a mechanical clapper that detects movement, pushing or rough play. The clapper hangs at the back right of the machine. If it moves and hits the metal ring, an alarm sounds and the diversion valve switches to the “house position” for a period of time, diverting falling coins to the house bank. The sensitivity of the clapper can be adjusted by turning the plumb-bob weight on the end of the clapper up or down.
RGB lighting
The Golddigger’s RGB lighting runs automatically whenever the machine is powered on — it is decorative and needs no operation. If your model includes a lighting mode/colour control, it is located with the other controls behind the front door.
Audio system
The premium audio system at the back of the machine starts playing automatically as soon as the power is switched on. The music or background sounds are stored as MP3 files on an inserted USB stick; these files can be changed or supplemented by the user. The audio system has buttons for adjusting volume, bass and treble, as well as a separate on/off button that lets you switch off the audio completely while the machine is in operation.
The controller and settings menu
The digital controller (“coin computer”) is mounted inside the machine and has a small display and a 4-button service keypad. It is for the operator/servicer — players do not use it. From top to bottom the buttons are:
Button
Function
#1 — Setting
Enter the menu.
#2 — Select / Exit
Select the displayed code to change its value; press again to return to the code list. At code a0 it exits the menu.
#3 — Up (+)
Move to the next code, or increase the value.
#4 — Down (−)
Move to the previous code, or decrease the value.
To change a setting: press #1 to enter the menu → press #3/#4 to cycle to the code you want (the code blinks) → press #2 to select it → press #3/#4 to change the value → press #2 to return to the code list. To exit: cycle to a0 and press #2 — settings are saved.
Setting codes
Code
Function
Range
Default
What it does
a1
Pusher activation time
1–250
30
Seconds the pusher runs per credit. Higher = more play time per coin.
a2
Points (credits) per coin
1–10
1
Credits awarded per inserted coin. Set 2–5 for token / promo play.
a3
Payout threshold (coins)
1–20
1
How many coins must reach the win sensor before a payout registers.
a4
Anti-shake time
1–50
5
Lock-out period (seconds) during which the tilt sensor disables wins (anti-cheat).
Lifetime coins paid out (read-only audit counter).
a7
Total wins
—
—
Lifetime win events (read-only audit counter).
a8
Restore factory settings
—
—
Resets a1–a4 back to their defaults.
a0
Exit settings
—
—
Saves and exits the menu.
Setting up for events & free-play
For brand activations, fairs and free-to-play use you can tune the machine entirely from the settings menu — no mechanical changes needed:
More credits per token: raise a2 (e.g. 5–10).
Longer play per coin: raise a1 (e.g. 60 or higher) for more dwell time.
Run without payout (pure entertainment / brand activation): set a3 high (e.g. 20) so the payout threshold is rarely met.
Usage reports: read a5, a6 and a7 before and after an event to report coins in, coins out and wins.
Error codes
If the display shows an EE_ code, use the table below. Always switch off and unplug before opening the machine to investigate.
Code
Meaning
Likely cause / what to check
EE_02
Coin-out error
Payout hopper or coin sensor fault — a jam, an empty hopper, or a blocked/faulty optical sensor.
EE_03
Winning-sensor error
The win-chute optical sensor is blocked or disconnected — clear any obstruction and check the connection.
EE_04
Anti-shake error
The tilt sensor has triggered repeatedly — usually the machine being shaken, or a stuck sensor. Let it settle, or check the tilt-bob.
Clamping (stuck) coins
If coins get stuck in the coin acceptor during insertion, the coin acceptor needs to be adjusted better (see “Training the coin acceptor”). To remove stuck coins, press the red lever on top of the coin acceptor to allow the coins to pass through. The lever can also be operated while the coin acceptor is still clicked into place.
Coin counter
The controller is located on the inside of the front door. It has a coin counter that counts all coins inserted during the life of the machine. This mechanical counter cannot be reset and indicates how often the machine has been used. It may already show a value before the first use — this is normal, because the machine is extensively tested and checked again before shipment. (The digital controller additionally keeps its own audit totals under codes a5–a7.)
Periodic maintenance
Keep the plate, coin chute and sensors clean and free of debris; a blocked win-chute sensor is the most common cause of an EE_03. Periodically check the power cord and plug for damage, and confirm the levelling feet keep the machine stable. Always switch off and unplug before cleaning inside.
Taking the machine out of service
Turn off the switch on the back of the machine and remove the plug from the socket so that the power supply is completely interrupted. Do not leave the machine unattended while it is connected to the power supply.
Precautionary measures
Place the machine on a flat, stable surface and keep it upright.
Connect through a surge protector; switch off and unplug before opening or cleaning inside.
Keep hands out of the mechanism — the pusher can start moving at any time.
Supervise the machine with a competent adult; it is for entertainment only, not gambling or money payout.
Do not disassemble, alter or modify the machine without our permission.
Specifications may vary or change over time. Verify all specifications prior to purchase. No rights can be derived from this information.
Questions
Can it be branded with our design?
Yes — most machines can be branded by our design department per your specifications. Simply send your artwork and our team will go to work for you, delivering a turn-key custom-branded solution.
Do you provide warranty on your machines?
Absolutely! Each machine comes standard with a 1-year full service and parts warranty at any of our service centers, no questions asked. You can extend warranty to a full 2 years by clicking the option box above (highly recommended). See our T&C for details.
Do you ship to my country?
Yes — for sales we ship worldwide; for rentals we prefer to limit shipping to Western Europe. And if you have your own carrier account (FedEx, DHL, etc.) you can always arrange to have your order picked up from our service centers.
How are products packed?
For trucking, train or air cargo, crating is needed — check the option box above to add the custom wooden protective crating the carrier requires. If you arrange your own pickup, crating is optional and may save you the cost of having a custom frame built.
Can you pre-load our prizes, tokens or content?
Yes — we can pre-load prizes, capsules, tokens or your own media so the machine arrives play-ready for your event.
Is it plug-and-play, or do we need a technician?
Most machines arrive pre-programmed and plug-and-play; setup takes minutes. For live events you can opt to have tech support as back-up per WhatsApp if you ever need a hand — see our service contract for expedited on-call assistance.



 English
  French
  German
  Spanish
  Italian
  Dutch
Dutch  Portuguese
  Polish
  Bulgarian
  Swedish
  Romanian
  Danish